
Oculus.com/Casting: How to Cast Your Oculus Quest to TV, Phone, or PC
Oculus.com/Casting: How to Cast Your Oculus Quest to TV, Phone, or PC
Oculus casting is a feature that lets you share your VR experience on an external screen so others can watch what you see in the headset. As XR Today explains, “Meta Quest casting allows you to share whatever you see in your VR headset with your computer, mobile device, or (certain) television sets.” In other words, you can mirror your Oculus Quest (now Meta Quest) gameplay to a TV in your living room, to your smartphone, or even stream it to a computer via the official casting website oculus.com/casting. This is incredibly useful for making VR more social – friends and family can see the action in real time, or you can record and stream gameplay for others to enjoy. In this guide, we’ll introduce what Oculus casting is, why it’s useful, and provide a step-by-step walkthrough on how to cast your Quest to various devices. We’ll also cover troubleshooting tips for common casting issues and best practices to ensure a smooth, high-quality casting experience.
What is Oculus Casting and Why Use It?
Oculus casting refers to the ability of Oculus/Meta Quest headsets (such as Quest 2, Quest 3, etc.) to wirelessly stream the view from your headset to another device like a phone, PC, or TV. This means that when you’re immersed in VR, others can see a 2D view of what you’re seeing, in real time, on a separate screen. Casting is useful for a variety of reasons:
- Sharing VR with others: It lets friends and family watch your gameplay or VR experience live, which is great for parties or collaborative play. For example, you can show off how skilled you are in Beat Saber or let others help you through a puzzle by seeing what you see.
- Social and educational purposes: In a classroom or demo setting, casting allows an audience to observe the VR content while one person uses the headset. It makes VR a group experience rather than a solitary one.
- Monitoring and safety: Parents can cast the VR view to a screen to supervise what their child is doing in VR. Or if someone is trying VR for the first time, others can guide them since they can see the same virtual environment.
- Recording and streaming: Although a bit more involved, casting to a PC can be a step toward recording gameplay or streaming it online for others to watch, without requiring special capture hardware.
In short, casting turns VR into a shared experience, bridging the gap between the person in the headset and everyone else in the room.
How does Oculus casting work? Oculus Quest headsets have built-in support to send the headset’s view over your Wi-Fi network to other devices. The most common ways to cast are:
- Casting directly to a television or monitor that has Chromecast capability (either a built-in Smart TV feature or via an external Chromecast device).
- Casting to the Meta Quest mobile app on a smartphone or tablet.
- Casting to a computer’s web browser by visiting the official casting website at oculus.com/casting.
All of these methods use your local Wi-Fi network to stream the video (and audio) from the headset to the target device. Oculus casting is supported on Oculus Quest, Quest 2, Quest 3, and other Meta Quest headsets. (If you have an older Oculus Rift or Rift S which connects to a PC, casting isn’t applicable in the same way, since those already display on your PC monitor.)
Why is casting done through oculus.com/casting? This is the official Oculus (Meta) casting page for computers. When you go to this site on your PC’s browser, it allows your Quest headset to find and stream to the browser window. It’s a convenient way to cast to any PC or laptop without needing additional apps. We’ll cover exactly how to use this in the PC casting section.
Before we dive into the step-by-step instructions, there are a few prerequisites to keep in mind to ensure casting works properly:
- All devices must be on the same Wi-Fi network: Your Quest headset and the device you’re casting to (TV, phone, or PC) need to be connected to the same Wi-Fi network; otherwise they won’t discover each other. Make sure you’re not on separate networks or a guest network that isolates devices.
- Good internet bandwidth: Casting is essentially live video streaming, which is resource-intensive and requires a fast, stable connection. The better your Wi-Fi signal and speed, the less lag or stutter you’ll encounter. Using a 5 GHz Wi-Fi network instead of 2.4 GHz is recommended for higher bandwidth and reduced interference.
- Use the same account login: Ensure that your Oculus/Meta account is logged in on both your headset and the casting target device/app. (For the mobile app or the oculus.com/casting webpage, sign in with the same account that the Quest headset is using.) If the accounts don’t match, the devices won’t be able to communicate.
- Headset and devices are powered on and updated: It sounds obvious, but double-check your Quest is on, and your phone/TV/PC is ready. It helps to update your Quest’s software to the latest version, as updates often fix casting bugs. Also update the mobile app if you’re using it. Having devices charged (or plugged in) is wise, because casting can drain the Quest’s battery faster than normal use.
- Supported browsers and devices: If casting to a computer, note that the Oculus casting website currently supports Google Chrome and Microsoft Edge browsers (Firefox is not supported). For TVs, you need a Chromecast-compatible device. For phones, you need the Meta Quest (formerly Oculus) app installed (available on iOS and Android).
With these basics covered, let’s move on to the actual casting process for each type of device.
How to Cast Oculus Quest to a TV
One of the most popular ways to cast is sending your Oculus Quest view to a TV screen. This is great for group settings – everyone in the room can watch the VR action on the big screen. To do this, your TV needs to support Chromecast (the Google Cast protocol). Many smart TVs have Chromecast built-in, and of course devices like the Chromecast dongle or Chromecast with Google TV can be attached to any TV to add that capability. You’ll need your Quest headset and either a TV with Chromecast built-in, or a TV with a Chromecast device connected, and ensure both the TV (or casting device) and the Quest are on the same Wi-Fi network.
There are two primary ways to initiate casting to a TV: from the headset directly or using the Meta Quest mobile app as a controller. The easier method is directly from the headset using the system’s casting menu. Below are the steps to cast from your Quest headset to a TV:
Casting from the Oculus Headset to a TV (using built-in Chromecast):
- Turn on your TV and set it up for casting. Make sure the TV is on, and if you have an external Chromecast dongle, ensure it’s powered on and the TV is set to the correct HDMI input. The TV or Chromecast device should be ready to receive a cast. It helps to have the TV and Quest on the same Wi-Fi (which we ensured earlier).
- Put on your Quest headset. Press the Oculus/Meta button on your right controller to bring up the universal menu (the home menu).
- Open the Quick Settings/Share menu. In the universal menu, look for the Share option (it might appear as a “Share” icon or a camera icon on the menu bar). On newer software versions, you might have to select the clock in the menu to open Quick Settings, where you’ll find a Camera or Cast option. Select “Cast” from the sharing options. This will open the casting menu.
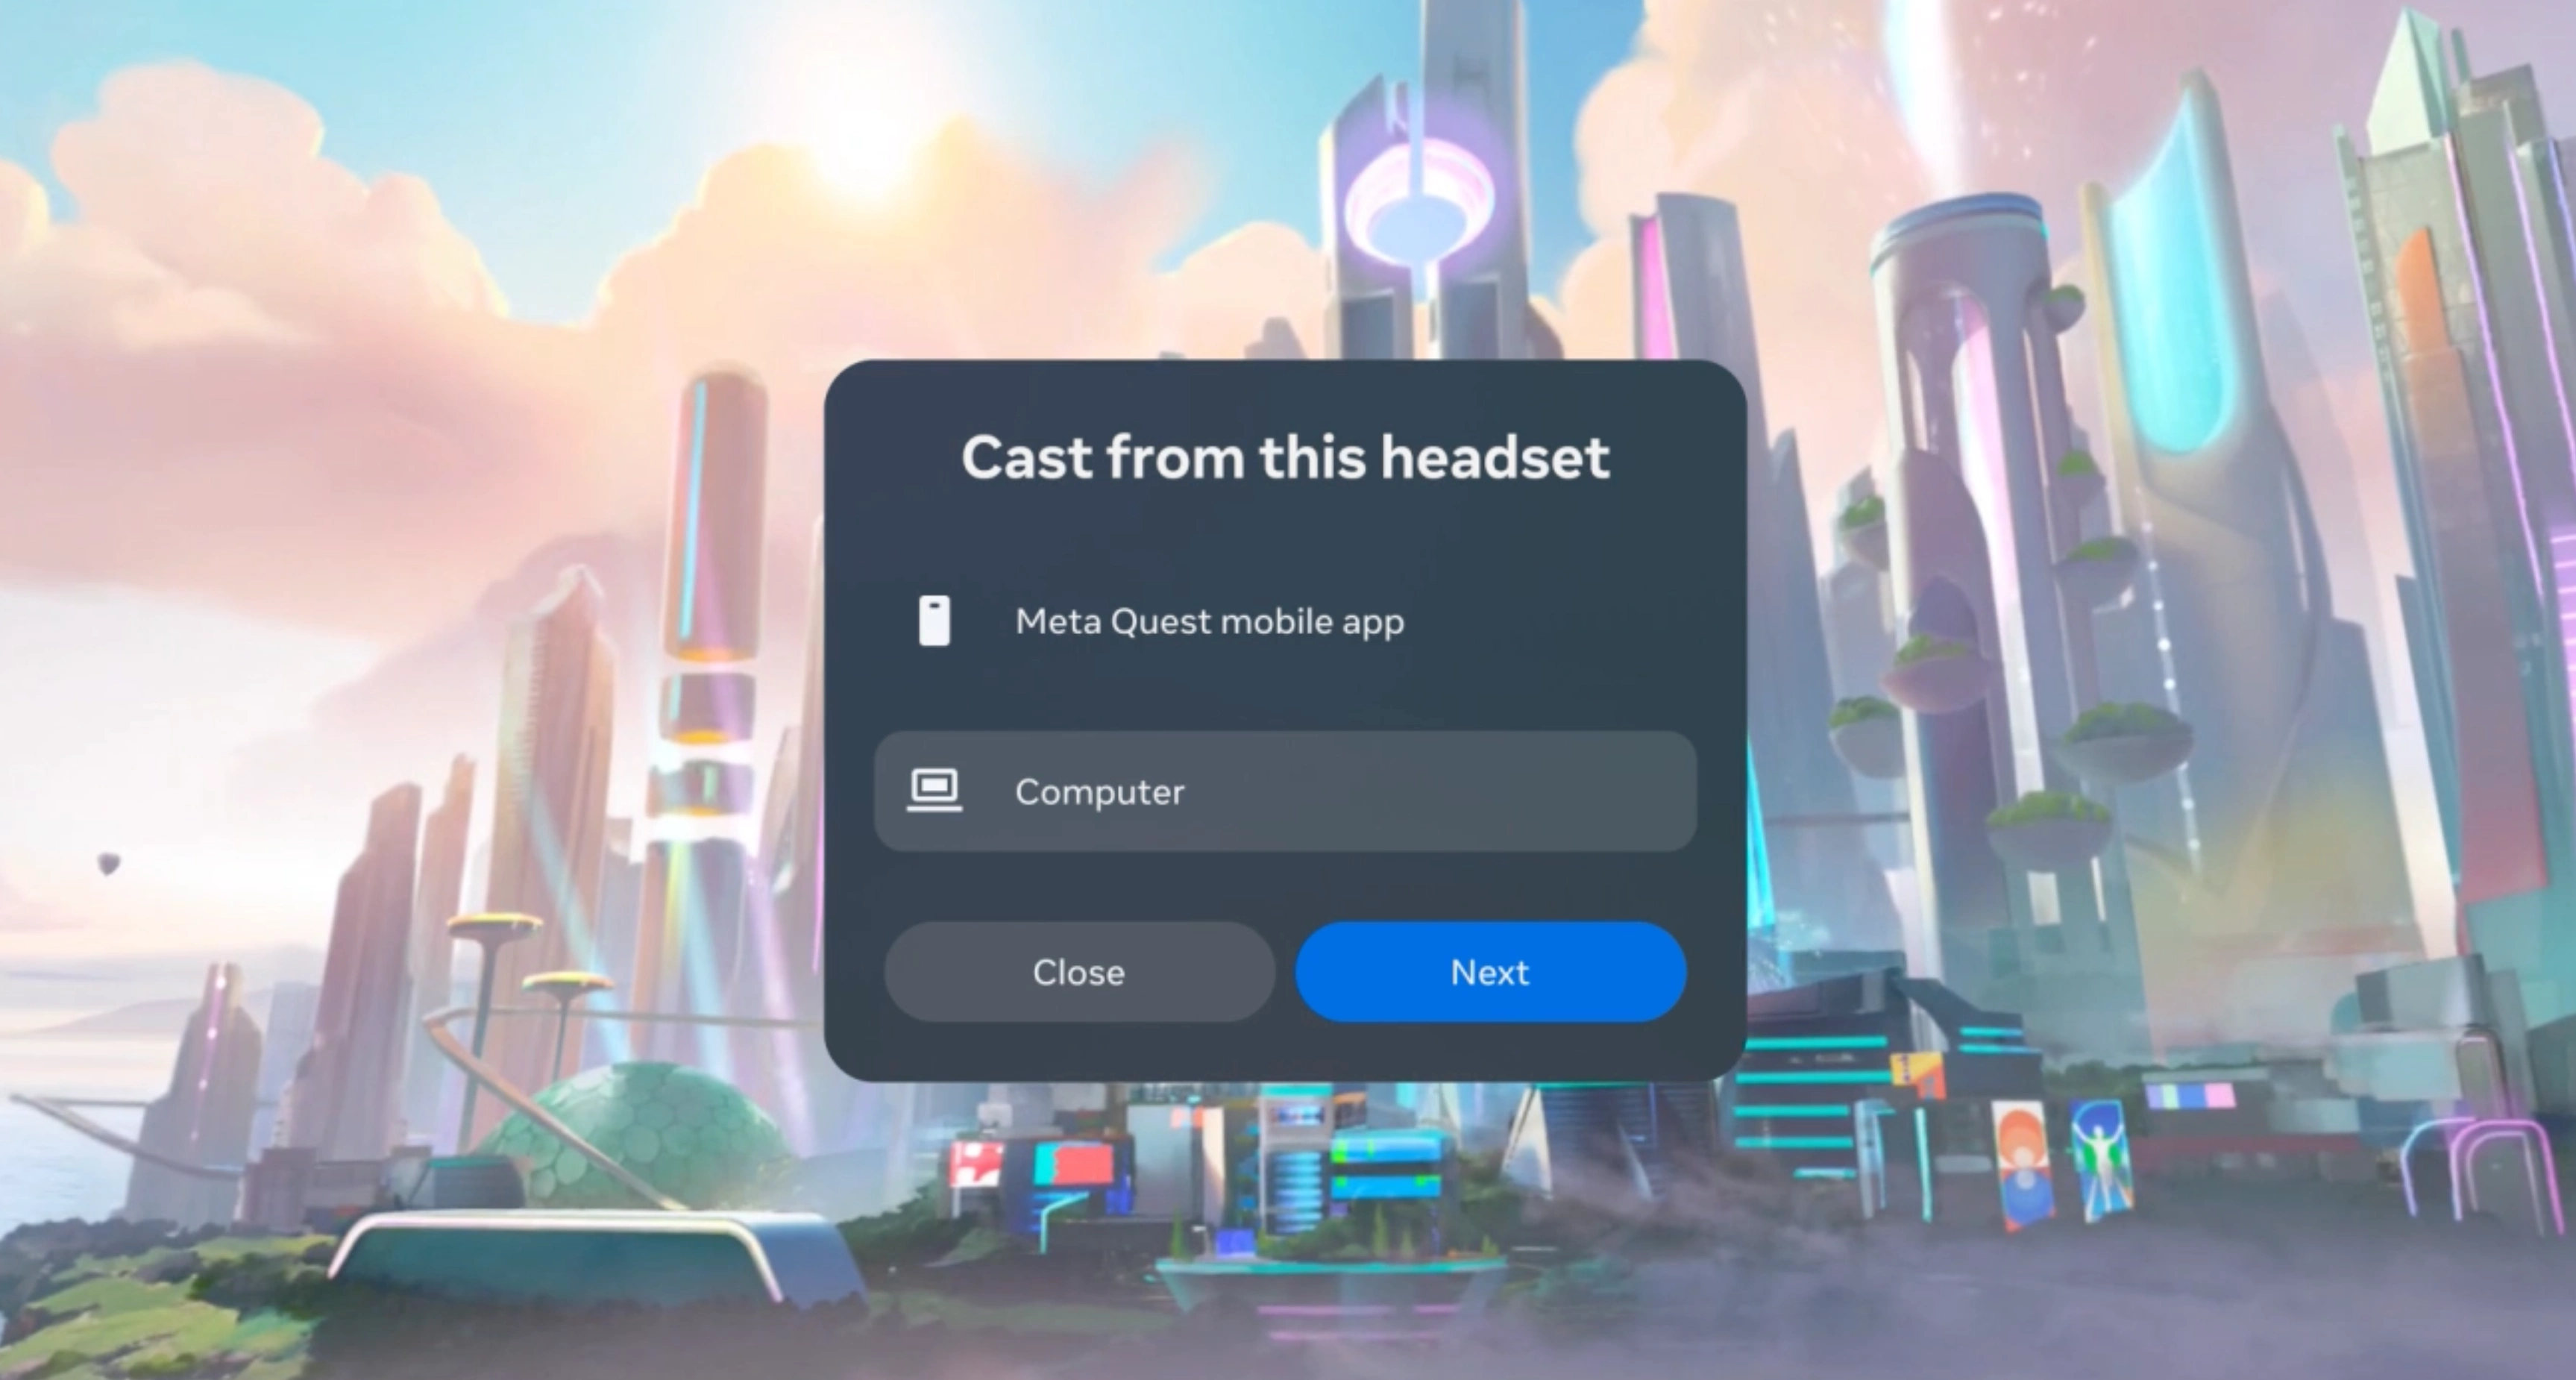
- Select your TV as the casting target. After you hit Cast, you should see a list of available devices on your network that can receive a cast. This list may show entries like your phone (if the app is open), any Chromecast devices, or even a “Computer” if the casting website is open on a PC. From the list, choose the name of your TV or Chromecast device that you want to cast to.
- Start casting. Once you’ve selected the TV/device, click “Next” or “Start” (the button may say Next on the headset interface) to begin casting. You should see a notification in VR that casting has started. Within a few seconds, your TV screen should display the view from your headset.
- Enjoy the VR view on TV. Now whatever game or app you run in VR, the others can see it on the television. There might be a slight delay (a second or two of latency), but it should be smooth if your connection is strong.
- Stop casting when finished. When you want to end the cast, you can either remove your headset and stop it from the Oculus mobile app or simply do it from the headset: open the casting menu again and select “Stop Casting.” Remember to stop casting when you’re done to free up network resources (and to maintain privacy once you no longer want your view shared).
Note: If your TV does not appear in the list of casting targets, ensure that the TV or Chromecast dongle is on the same Wi-Fi and not in guest mode. If it still doesn’t show up, you can try casting via the smartphone method (see next section) as an alternative. Also, not all smart TVs are fully compatible with direct casting from Quest. Meta has noted that while many modern TVs work, they don’t guarantee support for every model. If you run into issues, consider using an official Chromecast device or use the phone/PC casting methods below as a workaround.
Tip: Meta actually recommends using a phone or computer for casting rather than directly to Chromecast in some cases, because the Quest isn’t fully integrated with Chromecast and you may encounter streaming issues on certain TVs. So, if you find casting to your TV is choppy or disconnects often, try casting to the Meta Quest app on your phone or to a PC – these tend to be more stable. (We’ll cover those next.)
How to Cast Oculus Quest to a Phone (Using the Meta Quest App)
If you don’t have a TV available or you just want to quickly share your VR view with someone next to you, casting to your smartphone is a convenient option. Using the Meta Quest mobile app (previously called the Oculus app), you can receive the live feed from the headset right on your phone screen. From there, you could even further share or record the screen if desired. Here’s how to cast to a phone or tablet:
Requirements: Make sure you have the Meta Quest app installed on your phone (available on the Google Play Store for Android or Apple App Store for iOS). Log into the app with the same Oculus/Meta account that your Quest headset is using. Both your phone and the Quest must be on the same Wi-Fi network. It’s also a good idea to have your phone charged and do not let it go to sleep during casting, because if the phone’s screen locks or you switch to another app, the casting will stop.
Once you’re ready, follow these steps on the phone:
- Open the Meta Quest app on your phone. Ensure your headset is turned on. In the app, look for the Cast icon – it looks like a headset with a Wi-Fi signal (often in the upper right corner of the app’s home screen or under a menu labeled “Cast”).
- Select your headset in the app. The app will ask which headset to cast from (this matters if you have multiple devices or friends’ devices around). Choose your Quest headset from the list of devices. If this is your first time casting from the app, you might get a prompt to allow permission to find devices on the network – tap “Allow” when prompted to let the app scan for your Quest.
- Choose the target device as your phone. After selecting the headset to cast from, you’ll select where to cast to. In this case, choose This Phone (or it might show your phone’s name) as the casting target. (If you had a TV or Chromecast on the network, those would show up here too – but for now pick phone.)
- Start the cast. Tap the Start button in the app. You should see a message that casting has begun, and shortly, your phone should display the live view from the headset. There may be a brief delay, but you should get a smooth video if your connection is good.
- Watch the VR content on your phone. Now you can see what the person in VR sees, right on your mobile screen. Turn your phone sideways (landscape) for a larger view if you want. You can also enable volume to hear the sound from the headset through your phone.
- Stop casting when done. To stop, you can tap the Cast icon again in the app and then tap Stop Casting. Alternatively, the person in VR can stop it from their headset as well. Remember, if you close the Meta app or your phone auto-locks, the cast will end automatically, so don’t multitask on the phone during the session.
Troubleshooting tip (phone casting): If you cannot find your headset in the app or the phone isn’t discovering it to cast, double-check that:
- The headset is powered on and awake.
- Both devices are on the same Wi-Fi network (this is a common issue if one device is accidentally on a different network or using cellular data).
- You are logged into the same account on both. (Only the primary account on the Quest can cast to the app; if you are using a secondary user account on the headset, the app won’t find it.)
If issues persist, try closing and reopening the app, or rebooting your headset, then attempt casting again.
Casting to a phone is very handy if no bigger screen is available. You can even use this method and then mirror your phone’s screen to a TV (such as using AirPlay for iPhones, or Smart View for Samsung, or casting your whole Android screen via Chromecast) as a workaround for TVs that don’t directly support Oculus casting. For example, with a Roku TV (which doesn’t directly support Oculus casting), you could cast to your phone and then mirror the phone to the Roku TV. Just keep in mind that going through two wireless hops (headset -> phone -> TV) might introduce more lag.
How to Cast Oculus Quest to a PC (via Oculus.com/Casting)
Casting your Oculus Quest to a computer is perfect for when you want to display the VR view on a laptop/desktop monitor or even record/stream the feed. Oculus provides the oculus.com/casting web page for this purpose. With it, you don’t need any extra hardware – just a supported web browser and your headset. This method is often more reliable than casting directly to some TVs, and it’s great for presentations or capturing footage.
Follow these steps to cast your Quest to a PC or Mac:
- Open a supported web browser on your computer. On your PC or Mac, launch Google Chrome or Microsoft Edge (these browsers support Oculus casting). In the browser, go to oculus.com/casting. You will be prompted to log in to your Meta (Oculus) account – log in with the same account your Quest headset is using.
- Prepare the casting page. Once logged in, the Oculus casting webpage will be waiting for a connection. (It might show a message like “Waiting for headset to cast…”) This page is now ready to display your headset view. Note: This casting page only works on computer browsers; if you try to visit it on a phone, it will direct you to use the mobile app instead.
- Put on your Quest headset and open the Cast menu. Just like in the TV casting steps, press the Oculus/Meta button to open the menu, then find the Share/Cast option (often under a Camera icon in the toolbar or in Quick Settings).
- Select “Computer” as the cast target. In the casting menu, you should see an option for Computer (in addition to any other devices like phone or Chromecast that are available). Select Computer – this tells the headset to stream to the browser. Then click Next/Start to begin casting.
- Allow a moment for the connection. After hitting start, you should see your browser page change. Within a few seconds, the browser tab at oculus.com/casting will start showing your headset view (streamed over the network). Now your monitor will display what’s happening in VR.
- Unmute the audio (if needed). One quirk when casting to the browser is that the video stream might start muted by default. Look at the bottom of the video on the casting page: if you see a mute icon, click it to unmute the stream’s audio. This will allow you (and your audience) to hear the game sounds through the computer. (This is a common point of confusion – the cast does include sound, but the browser may mute it initially.)
- Optional: Full-screen the video. For a better viewing experience, you can click the fullscreen icon on the video or simply press
F11in the browser to make the whole browser go fullscreen. This maximizes the view of the VR content on your monitor or external display. - Stop casting when done. To end the cast, you can either close the browser tab or stop it from the headset (go to the Cast menu in the headset and hit Stop Casting). The video will stop and the browser will go back to the ready screen.
At this point, your VR view was successfully cast to your computer! You can even take it a step further and share that view from the computer elsewhere if needed (for example, using screen-sharing on Zoom, or recording the window using screen capture software).
Tip: If you want to display the VR feed on a TV but had trouble casting directly to the TV, you can use the PC as an intermediary. Cast to the browser first (as described above), then use Chrome’s built-in Cast feature to send the browser tab to your Chromecast-connected TV. This means the Quest streams to the PC, and then the PC streams that to the TV. It’s a bit of a roundabout method, but some users find it more stable for long sessions, since Chromecast direct casting can sometimes disconnect. Just keep in mind there will be a bit more latency with this two-step cast.
Note: Remember that the Oculus casting page works only in Chrome/Edge. If you try using Firefox or another browser, you might be scratching your head why nothing is happening – stick to the supported browsers for this to work. Also, performance can vary; casting to PC, like any casting, uses Wi-Fi bandwidth and the Quest’s processing power, so heavy-duty games might show slight stutters on the cast (even if they play fine in the headset).
Now that we’ve covered how to cast to different devices, let’s address some common problems you might encounter and how to fix them.
Troubleshooting Common Oculus Casting Issues
Casting is supposed to be straightforward, but in practice you might hit a few snags. Here are some common Oculus casting issues and their solutions:
-
Headset not found / Can’t see device to cast to: This usually comes down to a network or account issue. Make sure both the Quest and the target device are on the exact same Wi-Fi network (check that one isn’t on a neighbor’s or a different band). Also verify you’re logged into the same Oculus/Meta account on all devices. If casting to the phone app, ensure you’re using the primary account on the Quest (secondary user profiles cannot cast to the mobile app, though they can cast to a browser or Chromecast device). If everything looks correct, try turning Wi-Fi off and on on your headset, or rebooting your headset and device, then try again.
-
Cast disconnects or isn’t stable: If your casting cuts out randomly or is laggy, it’s likely a Wi-Fi strength or interference problem. Ensure a strong signal – ideally, use a 5 GHz Wi-Fi band and keep the headset relatively close to the router. If possible, minimize other streaming or heavy network usage during casting. Remember that casting is demanding; it can strain the headset and network, leading to lag or disconnects if conditions aren’t ideal. If you’re casting to a Chromecast and it keeps dropping, consider the workaround of casting to the app or PC, which Meta suggests can be more reliable. Sometimes simply restarting your Wi-Fi router can clear up the connection for smoother casting.
-
No sound on the casting output: If you can see the video on the phone/TV/PC but hear no audio, check a few things. On the phone app, make sure your phone’s volume is up (the cast should carry sound to the phone, which plays through its speakers or headphones). On PC via browser, as mentioned earlier, unmute the stream in the Oculus casting webpage – the small volume icon on the video player might be muted by default. Click it to enable sound. (If you still get no audio on PC, check your computer’s output device and volume.) Note that when casting to a TV via Chromecast, the sound should play through the TV; if not, ensure the volume isn’t muted on the TV or casting device.
-
TV or Chromecast not showing up as an option: Double-check that the TV/Chromecast is powered on and connected to the network. If your Quest still doesn’t list it, the TV might not be supported for direct casting. As a workaround, use the phone method: cast to the phone, then use your phone’s screen-mirroring to the TV. Alternatively, use a dedicated Chromecast dongle if the built-in casting of the TV isn’t working, since that tends to be more universally compatible.
-
Casting to phone stops when app is minimized: This is expected behavior – if you switch apps or lock your phone screen, the cast will stop. The solution is to keep the Meta Quest app open and active. Turn off your phone’s auto-lock or screen timeout temporarily while casting so it doesn’t shut off the display. If you need to multitask on your phone, there’s unfortunately no background casting feature, so the casting will pause.
-
Video quality is low or laggy: The cast quality will automatically adjust based on your network. If it’s consistently low resolution or choppy, focus on improving your Wi-Fi conditions. Make sure the headset isn’t too far from the router, and that your router isn’t overloaded. In some cases, casting while also recording or streaming can overtax the headset. Avoid recording video on the headset simultaneously during casting to improve performance (casting and recording together can cause lag or glitches). Also, ensure your Quest isn’t low on battery or thermally throttling – heat or low battery could reduce performance, so keep the headset charged and maybe even use a fan if you’re doing a long session.
-
Casting worked before, but now it’s not connecting at all: If things were fine and suddenly nothing works, try the classic fixes: restart your Quest headset, reboot your phone/computer, and even power cycle your router. Ensure the Quest’s software is updated to the latest version (check under Settings > System > Software Update on the headset). Software updates can resolve casting bugs. If you’ve recently changed your Wi-Fi password or network setup, you’ll need to reconnect the Quest to the new network in settings. In rare cases, a factory reset of the Quest could fix persistent casting issues, but do that only as a last resort (and backup data first).
-
Network restrictions (advanced): Be aware that certain networks (corporate networks, school campuses, hotels, etc.) may have security that blocks the peer-to-peer communication needed for casting. If you’re trying this in an office or dorm and it just won’t work, the network might be the issue. You may need to use a personal hotspot or a different router in such cases.
If you’ve tried all these troubleshooting tips and still can’t cast, you can reach out to Oculus (Meta) support for further help. However, in most cases, ensuring the network setup is correct and using the proper method will get your casting working.
Best Practices for Smooth and High-Quality Casting
To wrap up, here are some best practices to help you get the most out of Oculus casting. Following these tips will make your casting experience smoother and more enjoyable for everyone:
- Use a strong, fast Wi-Fi connection: Since casting relies on Wi-Fi, a robust connection is key. Whenever possible, use a 5 GHz Wi-Fi network (it offers more bandwidth and less interference than 2.4 GHz). Keep the headset within good range of the router. If the router supports dual-band, try to have the Quest and the casting device on the same band/frequency to avoid any segmentation issues. The faster and more stable your internet, the lower the latency and better the video quality.
- Minimize network congestion: For the duration of casting, try to limit other heavy internet usage on the same network. If someone is downloading large files or streaming 4K videos on the same Wi-Fi, it could eat into the bandwidth needed for casting. For critical casts (say, you’re demoing to a group), consider pausing other downloads or streams.
- Keep devices charged and cool: Casting can drain your Quest’s battery faster than normal play, because the headset is doing extra work. Start with a full charge, or even keep it plugged into a power source or battery pack if you’re casting for a long session. Likewise, ensure your phone or laptop is charged if you’re using those to receive the cast. Avoid your headset overheating – a hot device might throttle performance. Take breaks if needed to let it cool.
- Ensure you’re using the primary Oculus account for casting to the app: As noted, if multiple accounts are on the headset, only the primary profile can cast to a phone/tablet. So log in with the primary account on your Meta Quest app. If you want a secondary user to share their view, have them cast to a web browser or a Chromecast instead.
- Use the latest software: Update your Quest headset to the newest firmware and keep the Meta Quest app updated. These updates often include improvements and fixes for casting. For example, early versions of Quest casting were a bit unstable, but it has improved over time as Oculus/Meta worked on it.
- Keep your phone display awake (for mobile casting): If casting to a phone, go into your phone’s settings and set auto-lock to a longer time or disable it temporarily. This prevents the screen from going dark and interrupting the cast. Also, avoid switching apps. Consider enabling Do Not Disturb to prevent notifications or calls from disrupting the casting session.
- For best quality on PC, use Chrome or Edge in fullscreen: Other browsers might not work. Chrome and Edge also tend to handle the video stream well. Once casting, hit the fullscreen button to hide the browser UI for a cleaner look. If you experience stuttering on PC, try closing other tabs or background processes that may be taxing your CPU or network.
- Avoid simultaneous casting and recording/streaming on the Quest: If you need to record gameplay, it might be better to record from the casting device (e.g., use screen capture on PC) rather than using the Quest’s built-in recorder while casting. Doing both on the headset can cause performance issues as it struggles with two tasks. Similarly, be mindful that running very graphically intensive apps might impact the smoothness of the cast.
- Test the setup beforehand: If you’re planning to show VR to a group (party, classroom, etc.), do a quick test cast beforehand. Make sure you can connect to the target device and that audio is coming through. This way, you can troubleshoot in advance rather than in front of an audience. It will save you from last-minute technical hiccups.
- Have a backup plan: Sometimes technology misbehaves. If casting to a TV is mission-critical and it fails, be ready to switch to casting to a laptop, for example. Knowing the alternate methods (as described in this guide) can save the day if one method refuses to cooperate. For instance, if the phone app isn’t connecting, quickly hop to oculus.com/casting on a PC instead.
- Respect privacy and comfort: Remember that when you start casting, everything you see in VR will be visible to others. Make sure everyone is okay with that. If you’re going to navigate personal menus or content, you might want to stop casting briefly. Also, be aware that casting can add a tiny bit of lag in the headset as well; it’s usually negligible, but if you’re doing something where latency is critical (like competitive play), you might want to cast only when showing others casually, not during high-stakes gameplay.
By following these best practices, you’ll ensure that your Oculus casting sessions are as smooth and enjoyable as possible, with minimal technical interruptions. A strong network, proper setup, and awareness of the system’s limits will go a long way in providing a high-quality mirroring of your VR adventures.
Casting your Oculus Quest to a TV, phone, or PC is a fantastic way to share the magic of VR with those around you. Whether you’re slashing beats in Beat Saber, exploring exotic locales in Google Earth VR, or just watching someone paint in Tilt Brush, casting lets everyone in on the fun. With the step-by-step instructions provided above, you should be able to get set up easily via oculus.com/casting for your computer or through the Meta Quest app for mobile and TVs. Remember to keep an eye on your network and device settings, and use the troubleshooting tips if you hit any snags. Now you’re ready to host your own VR game night or show off a new app to your friends – happy casting!